Category Archives: Uncategorized

Fix for Android Clock App Crashing after Lollipop Update

Summary: If Android “stock” Clock app starts crashing after a system update to Android Lollipop, you can fix it with the three simple steps listed below.

I use a Samsung Galaxy S4 device, and it recently prompted me to install a system update.  The update was Android “Lollipop” 5.0.1 (kernel 3.4.0-4745659), which the phone had downloaded automatically.  I just had to tap a few buttons, and it installed itself.  The installation and app updates took about 20 minutes, during which I couldn’t use the phone.  But otherwise, it was pretty smooth.

A few of my settings had been lost when the phone came back up, so that was annoying.  But really the only thing broken seemed to be the clock/alarm app.  Mind you, this the “stock” Clock app that came with the phone.  Each time I’d open the app, I’d see it for about one second before I’d get this error message:

Unfortunately, Clock has stopped.

A few Google searches turned up other users who’d had this issue.  Most of the responses suggested restoring factory settings, which seemed a little extreme (granted, I don’t know everything that’s impacted by that).  But then I stumbled upon a helpful thread that provided a very simple solution.

Evidently, Clock crashes because it doesn’t have a date format setting after the system update.  Sure enough, when I opened the Clock settings, none of the option buttons were selected.  The trick for fixing it is three simple steps:

1) Open Settings and scroll to the “More” panel.  Tap the Date and Time item.

Date and Time Settings

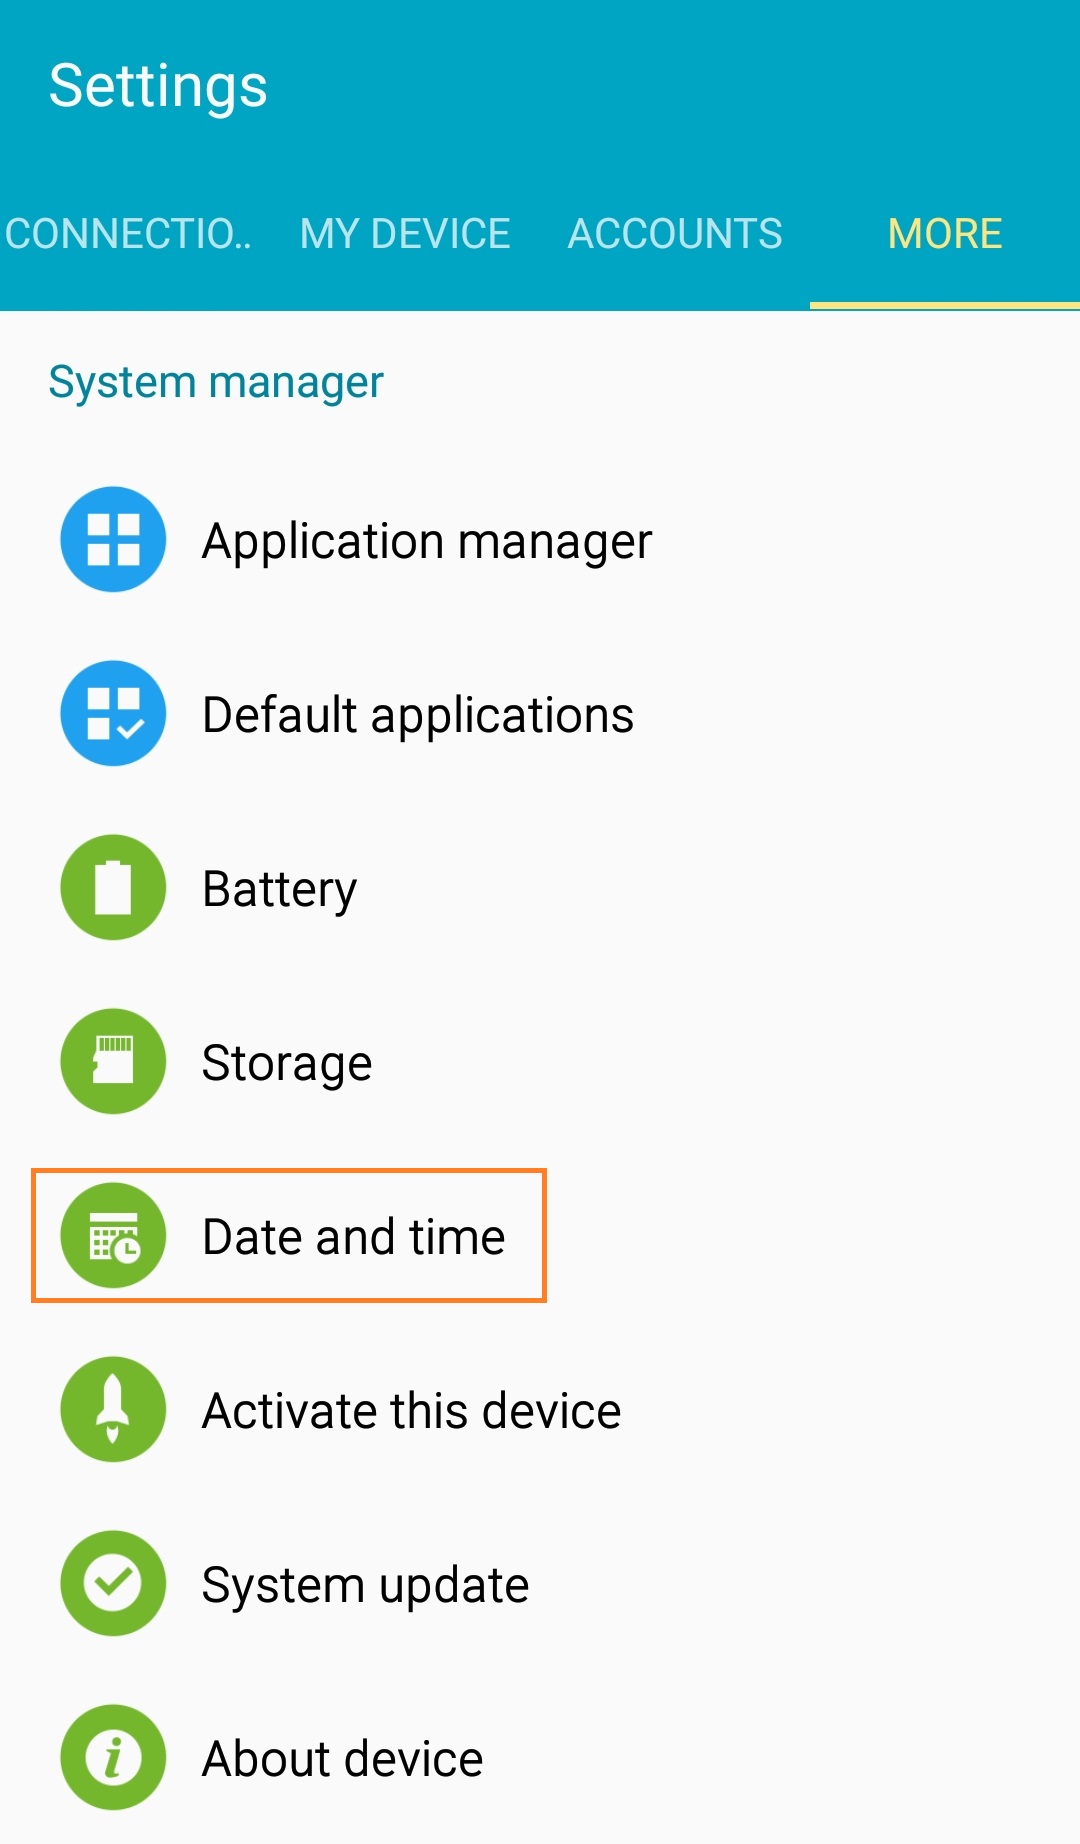
Select “Date and Time” settings.

2) In the Date and Time settings, choose Select date format.

Choose "Select date format"

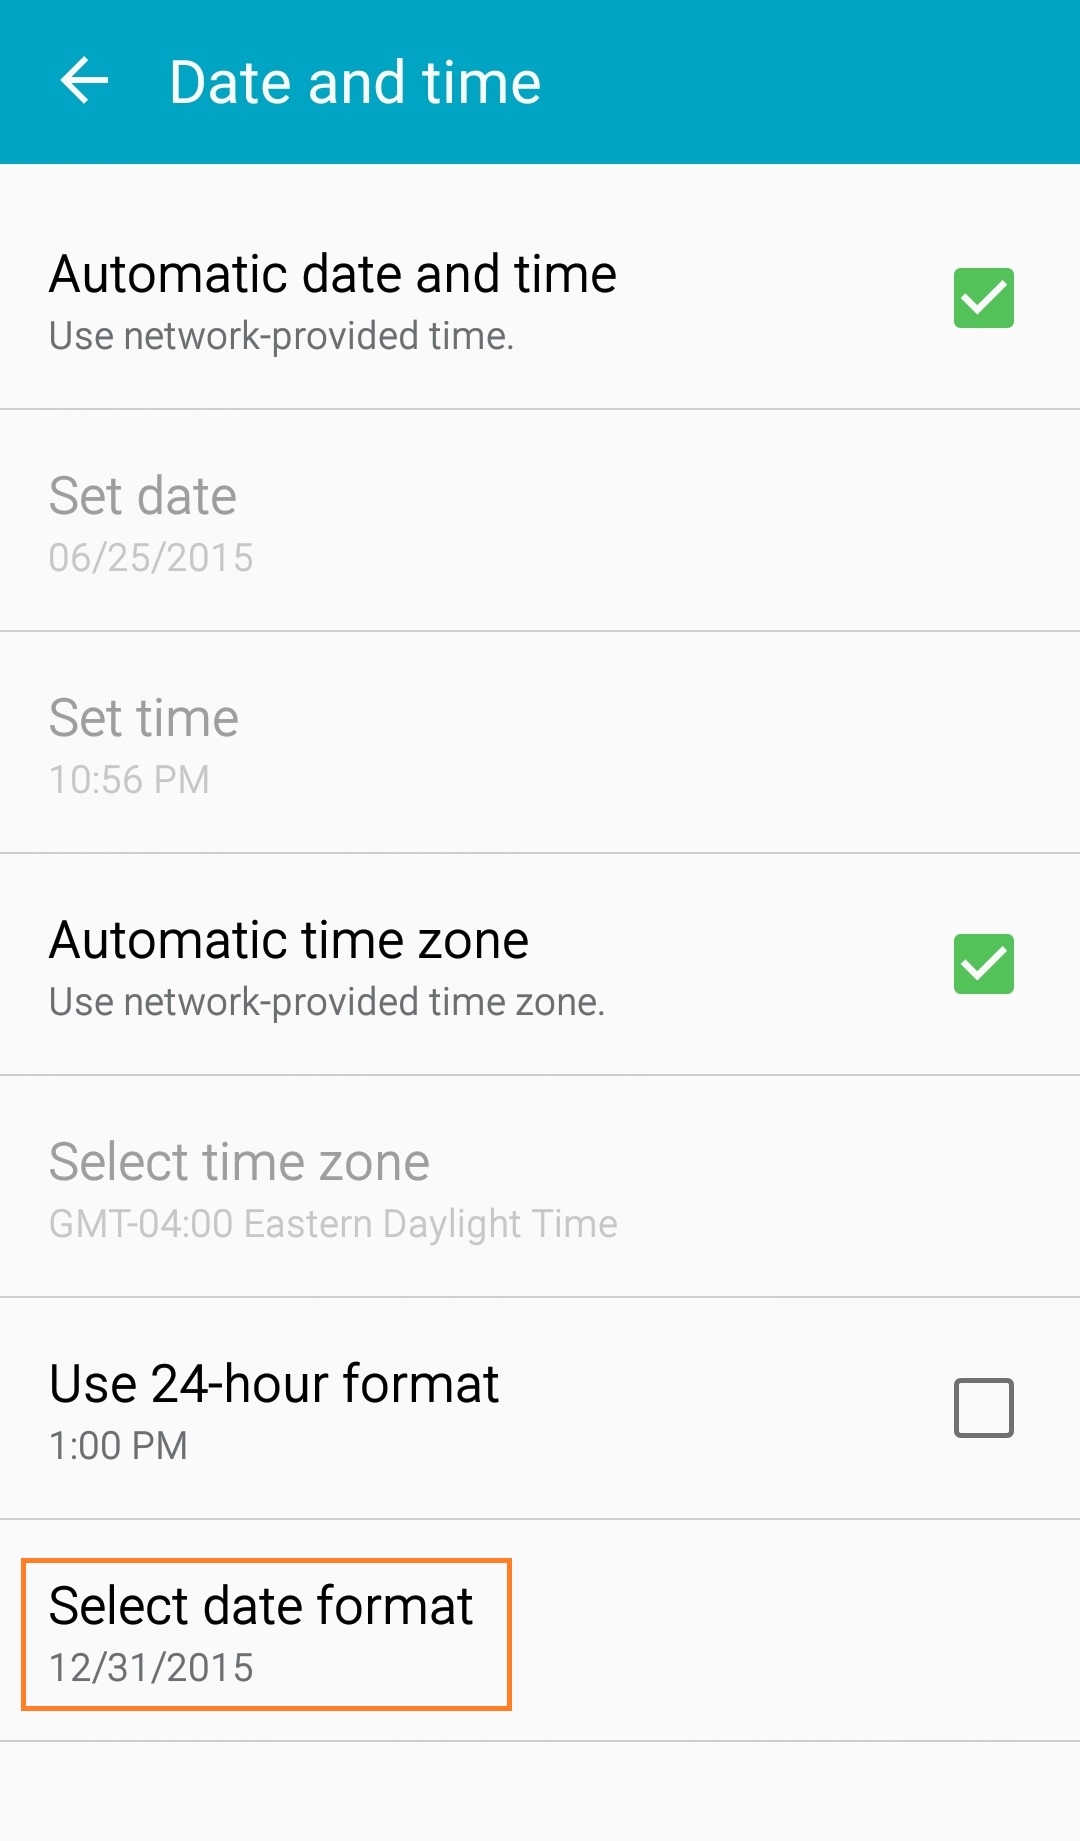
Choose “Select date format”

3) In the date format dialog, choose Regional format (other formats might work too).

Select "Regional" date format.

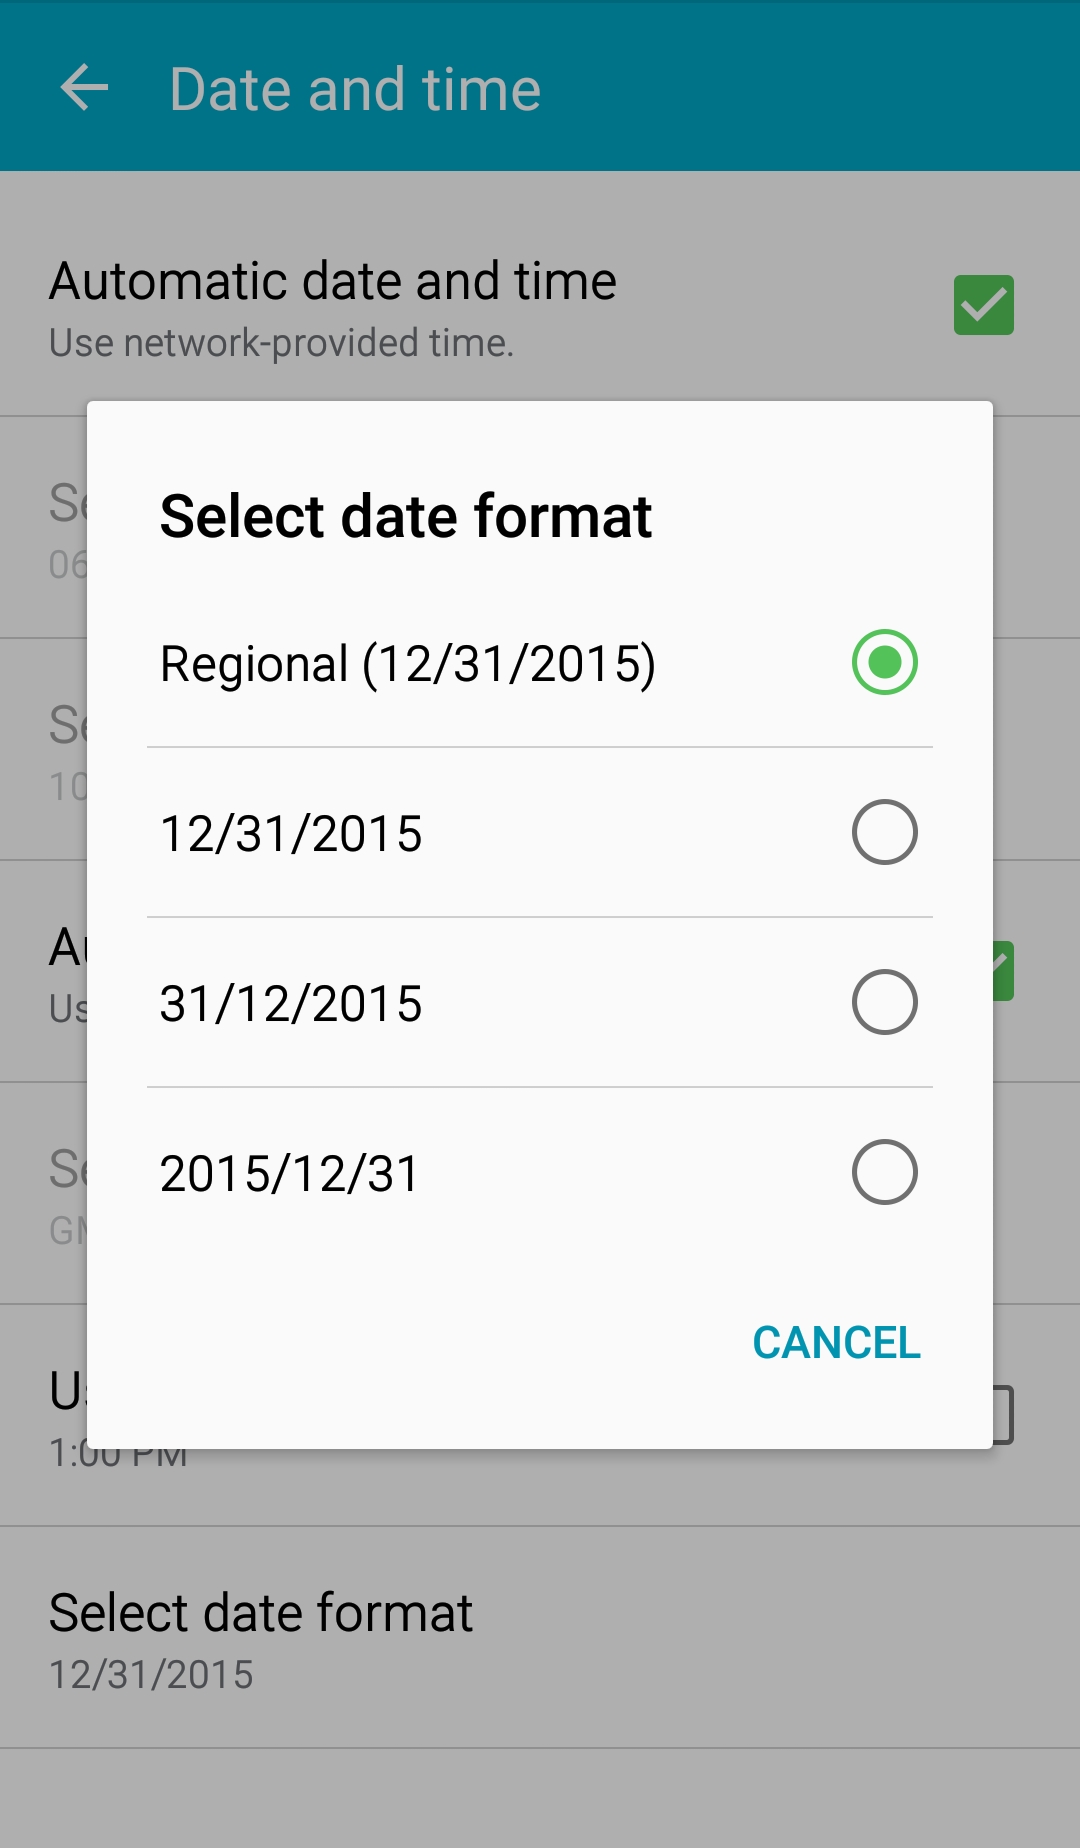
Select “Regional” date format.

That was all it took!  After that little fix, the Clock app started up just fine.  Simple fix, and you can avoid restoring factory defaults or doing anything else drastic.

I never would have discovered this on my own if I hadn’t stumbled upon the forum entry linked above, so I’m hopeful that someone finds this more formal writeup useful.  If you do, please leave a message in the comments.

Apache and mod_rewrite on Debian

I was recently trying to run a web application I cloned from GitHub, and it wasn’t working.  While I’m pretty familiar with Tomcat, this was the firs time I’d tried to use Apache, and I almost didn’t know where to begin.  Here’s what I learned.

(The details of this post apply to a Debian 7 setup.)

  • Apache was already installed.  I went into Synaptic and did a search.  It’s already there!  And it’s configured to run on startup, by default.  You can verify that the process is running with: ps -Aef | grep apache.  You can also visit http://localhost in a browser and expect to see a default “It works!” page served back to you.
  • By default, Apache configuration files reside in /etc/apache2/
  • By default, Apache serves up pages from /var/www/
  • mod_php was NOT installed.  This was obvious because my page wasn’t getting its includes, and when I viewed the page source in the browser, the PHP code was still listed in the page, unexecuted.  I was able to install the mod_php “meta” package through Synaptic pretty easily.
  • mod_rewrite is not enabled by default.  I figured this out because the particular app I was trying to configure had links that were pointing to pages that weren’t present in the directory listing.  When I’d click those links they’d return 404 errors.  Those pages just didn’t exist, so I figured something must be modifying the request or intercepting the routing (a la Angular or a similar SPA framework).  A little snooping in that directory listing revealed that the .htaccess file had quite a bit of code, and I realized that these instructions were rewriting the requests.  I’d heard of mod_rewrite before, so that’s where I started digging.
  • mod_rewrite is available in the default installation.  You’ll see rewrite.load if you list the files in /etc/apache2/mods-available/.  It’s not enabled though, so you’ll see that there’s no reference to it in /etc/apache2/mods-enabled/.
  • Nearly every online references I read told me to enable mod_rewrite with the command sudo a2enmod rewrite.  My installation had no clue what a2enmod meant, and told me “command not found.”  I believe a2enmod is a script that’s specific to Debian installations, but I didn’t/don’t have it, so I had to find another way.
  • I believe all that a2enmod does is create a symbolic link in /etc/apache2/mods-enabled/ that points to a load file in the /etc/apache2/mods-available/ directory, so I just needed to do that manually:  ln -s /etc/apache2/mods-available/rewrite.load /etc/apache2/mods-enabled/rewrite.load
  • Then, I needed to replace all occurrences of “AllowOverride None” with “AllowOverride All” within the /etc/apache2/sites-available/default file.  I’m not certain what this particular step accomplishes, but I read this step on Xmodulo, and it’s required (I tested it with and without this step, and out of curiosity, I also verified that the word “all” is not case-sensitive in that change.)
  • Finally, my configuration was complete, and I just needed to restart Apache:  sudo /etc/init.d/apache2 restart.

After that series of steps, everything worked.  Your mileage may vary, of course, so feel free to drop a comment and let me know.  Also, I welcome an education if you wish to clarify anything my writeup was shaky on.

Install Flash Player for Mozilla Firefox Manually on Debian 7

Adobe_Flash_Player_v11_iconI have a general disdain for Flash-based applications. But unfortunately, certain sites like Google Finance and Yahoo! Finance seem to like Flash for chart presentation.

I had previously installed the GNU Gnash Plugin. I’d much rather use GNU software than something from Adobe. But recently, my Gnash Plugin for Firefox had been misbehaving. (Perhaps because of an outdated version?) So I decided to upgrade– and give in to Adobe– and the steps for installation are pretty simple. I captured them here.

  1. First, download the software from Adobe. You’ll see a selection box asking you what version to download (RPM, YUM, etc), and you should choose the generic “.tar.gz for other Linux” bundle. Save that to a convenient place, e.g. /tmp/flash/install_flash_player_11_linux.i386.tar.gz (I’ll assume that location going forward)
  2. From the command line, extract the contents of your download:

    cd /tmp/flash
    tar -xvf install_flash_player_11_linux.i386.tar.gz
    

    Among the resulting files will be libflashplayer.so. That’s the one Firefox cares about (I think the other files are related to the stand-alone Flash Player.)

  3. Copy libflashplayer.so to the /usr/lib/mozilla/plugins directory:
    sudo cp /tmp/flash/libflashplayer.so /usr/lib/mozilla/plugins/
    

    It’s assumed that your system will already have that directory, but there’s a chance you’ll need to create it. Depending on which distro of Linux you’re running, there are several directories that Firefox might check for plugins. When in doubt, trust Mozilla’s documentation of this.

  4. Finally verify that your Flash plugin is both present and activated. Restart Firefox, and on the menu bar, click “Tools > Add-ons…” and view the Plugins listing. You should see “Shockwave Flash” in the listing. Make sure it’s activated.

From there, enjoy playing some videos or charting some stocks!

Install Brother DCP-7020 Printer on Debian or Ubuntu

Here are some super easy steps for getting your Brother DCP-7020 printer to work with Debian or Ubuntu.  Note that getting the scanner to work is a separate effort, which I might detail in a later post.

  1. Download the print drivers from this link (if they change the download page location, just use a search engine to find them, or possibly try the files attached to this post):
    http://welcome.solutions.brother.com/bsc/public/us/us_ot/en/dlf/download_index.html?reg=us&c=us_ot&lang=en&prod=dcp7020_us&dlid=&flang=English&os=128&type2=-1
    You will need both the LPR driver and the CUPS Wrapper.
  2. Once you’ve downloaded the drivers, open up a command window, and become super user (use the “su” command; you can probably just use “sudo” with these commands too).
  3. Issue the following commands to (1) install the LPR driver, (2) install the CUPS wrapper, and (3) verify that your installs were actually installed:
    dpkg  -i  –force-all  (lpr-drivername)
    dpkg  -i  –force-all  (cupswrapper-drivername)
    dpkg  -l  |  grep  Brother
  4. One more verification step:
    Open a web browser and go to http://localhost:631/printers to verify that your printer is found.
  5. Type some text in a text editor and print a test page!

The DEB files that worked for me are zipped here:
brother7020

I presume I’m allowed to publish those DEB files here since the code itself is open source; I hope I’m correct.

Note: These steps are published by Brother in a very straightforward manner, and I highly recommend you check their page for some extra detail. My writeup just flows from my wanting to capture my own experience in case I need to repeat the steps for my personal setup.

Another note: I’m running a 64-bit system, and a long time prior to setting up the Brother printer as described in this article, I took some other steps to get printers working in Firefox. I’m not sure if those steps had any impact on making the procedure outlined in this post successful, but you might want to review it anyway.

Upgrade Debian 6 “Squeeze” to Debian 7 “Wheezy”

I’m no linux guru, so when it came time to upgrade my 2 linux boxes, I was a little nervous at first. In the past, I had never stuck with the same distribution for very long, so “upgrading” really just constituted installing and trying out another distro (Salix, Mint, etc.) where a previous distro used to be. Turns out, Debian is particularly easy to upgrade with the following steps, many of which were borrowed from here.

(Forgive my laziness about formatting this post; I might come back and spruce it up later, but for now I’m just capturing my notes.)

  1. In a terminal screen, login as the “root” user by issuing the “su” (Super User) command.  This is important, and it was absent from where I was getting my instructions.  My first time through, I attempted the first few steps with “sudo apt-get…”, and that just didn’t seem to be working.  The rest of these steps should be executed as ROOT.
  2. #bring your Squeeze package listings up to date
    apt-get update
  3. apt-get upgrade [upgrades your packages]
  4. apt-get dist-upgrade [upgrades all distribution-specific files, presumably]
  5. If you want to be really careful, run a few other checks, as described at the link above, such as the “dpkg –audit” command to make sure everything’s in good order.  Assuming all is well, move on.
  6. Using vi or another text editor, modify /etc/apt/sources.list, and replace each occurrence of “squeeze” with “wheezy”.  Save file.  Now that Aptitude/Synaptic will be looking at the Wheezy-specific distro files, next steps actually install them.
  7. apt-get update [brings your package listings up to date for Wheezy]
  8. apt-get upgrade [upgrades your packages to their Wheezy best]
  9. apt-get dist-upgrade [upgrades your OS and kernel files to Wheezy (I think)]
  10. reboot
  11. Verify the version updates were recorded by running “cat /etc/issue” and “cat /etc/debian_version”

Notes along the way:

  • (upgrade/dist-upgrade) You’ll be prompted to approve some disk space usage.  [Y]es, you should approve it.
  • (upgrade/dist-upgrade) You’ll be prompted with some update notices for certain software.  Advance through the notices by pressing the spacebar until you get to the end of the notices, then press “q” to quit from the notification.  Upgrade will resume on its own
  • (upgrade) You’ll be prompted to overwrite “/etc/dhcp/dhclient.conf”.  I said [Y]es to overwriting with the maintainer’s version, because I didn’t see anything special/custom in my own version.  This was not the default option; I’m not sure this one mattered to me.
  • (upgrade) You’ll be prompted to overwrite “/etc/sudoers”.  I took the default option, [N]o, because I had added some users and didn’t to overwrite with a generic version from the maintainer.
  • (dist-upgrade) You’ll be prompted to restart a bunch of services after they’ve been upgraded.  Do it, of course.
  • (dist-upgrade) I got some firmware warning suggesting that the new kernel might need libraries/files that weren’t available in the “free” version, and tell me I might want to add “contrib non-free” to the sources.list lines.  I had already added those “contrib non-free” modifiers though, so I’m not sure what the issue was.
  • (after reboot) I was offered to reuse my old XFCE desktop panel config, and I chose to do so.  I did, however, have to change the resolution for my monitor to get it back to how it was.

Follow up notes:


  • When booting, Grub still offered the old kernel (2.6.x I think), but defaulted to the new kerkel (3.2.x I think). I found that when booting into the new kernel, the system would freeze 10-15 minutes into the session. I didn’t see this if I booted into the old kernel. To fix this, booted into the new kernel and disabled the screensaver. That appears to solve the issue, so there must be something screwed up about the XFCE screensaver in my update.

  • Perhaps related to the screensaver issue, my system seems to have started detecting 2 monitors, because when I right-click on the desktop and enter the “Desktop Settings” dialog, 2 monitor tabs are listed. I think this might be why I was seeing the weirdness described above whereby the resolution was screwed up. I don’t really know what’s going on, but perhaps you’ll see something similar. Good luck.

Installing DD-WRT on Rosewill RNX-N150RT Router

I doubt I’m going to break new ground with this post, but I like to use this blog to capture info I’ll use down the road, so here goes.

I recently purchased a Rosewill RNX-N150RT router, which is known to be compatible with dd-wrt. Today I attempted to flash my router with DD-WRT.

Despite a ton of warnings in the instruction steps, the procedure was pretty simple:

  1. Download the two “.bin” files from here; at the time of this article’s publication in July 2013, the files were “factory-to-ddwrt.bin” and “rosewill-RNX-N150RT-webflash.bin“.
  2. Perform a 30/30/30 reset (continuously hold reset button for 30 seconds of each of: 30 seconds while router is on, pull plug and retain reset hold for 30 seconds, plug in router and retain hold for 30 seconds).  This resets factory defaults on the router to “admin/admin” for user name and password.
  3. Login to router using the web interface at 192.168.1.1.  Using Admin GUI interface, upload firmware.  Utilize the “.bin” from that first file, “factory-to-ddwrt.bin“.  When update is complete, it’ll look kinda like everything worked, but still proceed (may or may not be necessary, but I didn’t risk it).
  4. Perform another 30/30/30 reset.
  5. Navigate to 192.168.1.1 and login (no need to change username/password settings if the option is offered).
  6. Using Admin GUI interface, upload firmware.  Utilize the “.bin” from that second file, “rosewill-RNX-N150RT-webflash.bin“.  NOTE: this step kinda failed subtly when I ran it because I was using Firefox (version 21.0 at the time).  There are notes in the instruction steps indicating the Firefox can act up during this process, but fortunately I had Chrome on my machine too, so I repeated this step under chrome.  Make sure you have a 2nd browser ready before starting this!  The way I knew it was screwy is because every time I tried to save/apply changes to the router settings, I’d get a response in the browser that the page was unavailable.
  7. Perform another 30/30/30 reset.
  8. Login and update username/password as you do so (I think it prompted me to do so).  Configure as you see fit, e.g., change network name, wireless password, etc.
  9. Perform a final  30/30/30 reset.

Why do all this?  Well there are several reasons, but I did it for one reason only: the off-the-shelf Rosewill software was NOT playing nice on my wireless network.  My network devices were dropping packets left and right, in obvious fashion.  The speed when loading pages from my laptop (wireless connected) was horrendous, and I was almost ready to send the router back to the retailer.  Maybe something was misconfigured– although I only changed the network name and password– but it was literally unusable as it was.  The wired connections were fine, but wireless was awful.  After flashing the router with DD-WRT, I saw a significant boost in page loads on my wireless device.  That made me think something about the Rosewill firmware was screwy, but I’m good to go now, and I don’t want to mess with it.

I’m somewhat familiar and comfortable with DD-WRT, and since I’m not a power user of my router, I’ll probably leave it alone at this point.  However, I am curious about putting OpenWRT or Gargoyle on it.  Anyone know a good reason to do so?

Does 1&1 Store Unencrypted (clear text) Passwords?

Something alarming happened to me yesterday.

I’ve been hosting my web sites with 1&1 for years. They offer some very low rates for monthly web hosting– particularly for people like me who don’t get a lot of traffic– and they seem to be as reliable as anyone else for small-time hosting. (Mind you, I refuse to use GoDaddy based on their their initial SOPA stance, and you should too.)

Yesterday, I called 1&1’s cancellation department because there was something in my contract that wasn’t appearing correctly.  I had recently purchased a new package, done some domain transfers, and otherwise shifted things around in a confusing way, so I was just making sure that everything was showing up where expected before I attempted to cancel the obsolete package(s).  The customer service representative (CSR) in the cancellation department couldn’t explain to me why things weren’t showing up as I expected, but he offered to perform my cancellation over the phone… he’d just need my password.

“My password?!” I asked incredulously.  “People can overhear me right now, so I’m not at liberty to disclose that over the phone.  Why do you need my password?”

“We need your password to perform a cancellation sir,” he replied.

I kindly explained that I didn’t actually need a cancellation yet, as I was just trying to understand the situation.  He suggested that Tech Support could offer better assistance on that, so he transferred me to a female CSR in that department.

The female CSR couldn’t answer my question either, so she offered to escalate.  Again, same story:

CSR: “What’s your account password, sir?  I’ll need that to escalate a case.”

Are you f*cking kidding me?  You want me to supply my password over the phone just to log a help desk ticket?  Unfortunately, I didn’t have much choice, so I gave her the password and eventually got my question answered via email.

BUT… the real question/issue is this:

WHY is 1&1 storing my passwords in the clear?  WHY can a CSR verify the plain text of my password over the phone?  WHY on Earth is my ACCOUNT PASSWORD not encrypted/hashed into a garbled unreadable mess?!

Sure, it’s possible that the CSR typed my password into a hashing program (or the site itself) to validate what I gave her, but I sincerely doubt it.  And even so, would that be any excuse for forcing me to give my password over the phone?

More likely though, they’re not encrypting my password, and she compared the password I gave her on the phone to the plain text in front of her.  And that makes me nervous.

Considering high profile hacks like the one that happened PlentyOfFish a few years ago, you’d think sites would wise up and start encrypting their passwords.  Especially a web host that’s “Proud to be the Best in the World” at “12 million customer contracts strong.”

I think it’s time to find a new web host.

Execute Document Ready Code on Angular Partials/Views

I’m dabbling with a rewrite of LoanGrid.net, and I’m considering using a single-page app approach with Angular JS as my foundation.  An issue I ran into when using views (aka “partials”) is that the standard jQuery ready() feature doesn’t work (or at least, is not reliable).

The quick work-around was discovered here:

function yourController($scope) {
   $scope.$on('$viewContentLoaded', YourDocReadyFunctionName);
}
That’s just a quick excerpt, and there are some caveats on how to properly execute that (no parentheses after the function name, for example).  Joel did a nice job capturing his experience, so rather than duplicate what he wrote, I encourage you to read his article about it!

Resolve jQueryUI and Twitter Bootstrap Button Conflict

I’ve gone through many design iterations with my side project, LoanGrid.netjQueryUI has been my widget library of choice, but I’ve recently begun experiments integrating Twitter Bootstrap with my designs. I was humming right along until I started using the jQuery Spinner element. Suddenly my styles weren’t showing up on the spinner arrow buttons.

A little research turned up a known issue when using jQueryUI and Twitter Bootstrap together. There’s a conflict between jQueryUI and Twitter Bootstrap buttons because they both define $.fn.button().  And as we can see from the jQuery Spinner API docs, our spinner depends on the button element.

A workaround is here:

var btn = $.fn.button.noConflict() // reverts $.fn.button to jqueryui btn
$.fn.btn = btn // assigns bootstrap button functionality to $.fn.btn

Thanks to user fat for posting the workaround code!

I haven’t run into any other conflicts, but I’m only using a small sliver of the widget features.  However, there appear to be more conflicts between the libraries, which is the impetus for Addy Osmani’s (admittedly slow-moving) jQuery UI Bootstrap project.

Changing a Limited Liability Company (LLC) Name in Virginia

I am a small business owner, and I recently went through the chore of changing my company name.  The original name I chose was a hasty decision, so I wanted something I’d be a little happier with.  The good news is, it’s not too hard to do.  It’s just a little tedious.  And even though this process is described for Virginia, I suspect the process is pretty similar in other states.

Disclaimer: I am not a lawyer.  I have no legal credentials, and I don’t purport to.  I’m just documenting what worked for MY specific situation, and I take no responsibility for you or your situation.  If you have questions, you should consult a qualified legal and/or tax professional (which I am not) before you undertake any corporate entity changes.

Fortunately, Virginia provides good online resources, so the folks in Richmond are doing something right.  Your best resource for getting started with this sort of thing is the State Corporation Commission’s Office of the Clerk.

The steps I took are written below.

  1. Decide on a Name.  This one sounds obvious, but the un-obvious part might be making sure your company’s name is unique, and thus distinguishable from other businesses in the state records.  As with pretty much anything corporation related in Virginia, the State Corporation Commission’s Office of the Clerk is where to begin.  You can confirm that your proposed company name is unique using the Name Distinguishability Checker.  Once you’ve confirmed that the name you want is unique/available, it’s time to fill out a form…
  2. File your change with the Commonwealth of Virginia ($25). Corporate entities are chartered by the state, so that’s the entity with which you need to start.  I.e., you’ll notify the IRS and your county after things get squared away with the state.   For a business entity name change, the form you want is LLC-1014N: Articles of Amendment – Changing the Name of a Virginia Limited Liability Company.  It’s available in both PDF and MSWord.  (If you want to peruse the other forms available, an index of state LLC forms for a variety of purposes, such as Registered Agent Address Change or Articles of Cancellation, can be found here.)  Fill out this form as instructed, sign it, date it, and send a check for the stated fee ($25 at the time of this writing).  Send it off to address listed, then just wait.
  3. Wait.  That’s right.  Just sit tight while your mail gets delivered to Richmond and someone processes it.  While you’re waiting, you can periodically monitor the Name Distinguishability Checker to see if your submission has been logged in the system.  It took a few weeks for me before my desired name showed up as unavailable in the system (i.e., name is already in use, presumably by me), but as soon as it did, I was pretty darn sure I’d be the proud owner of it soon.  Sure enough, within 2-3 days of my name becoming unavailable on the Distinguishability Checker, the update took effect in my Business Entity Search record.
  4. Receive Confirmation from the State.  This is really just an extension of the previous “Wait” step.  That company name might be recorded as yours in the Clerk’s office, but until you receive confirmation in the mail, via an Articles of Amendment letter from the state, just be patient.  My amendment letter showed up in the mail 3-4 days after my Business Entity Record showed the change.At the time of publication of this article (early March 2013), state registration is the furthest step I’ve completed.  Everything after this is my understanding of what needs to be done, but I haven’t yet completed those steps.  I’ll try to update this article with additional details as the next steps get completed.
  5. Notify the IRS.  Now that you have official documentation from the state, it’s time to tell the feds.  You’ll want to make sure you can keep your EIN (assuming that’s permissible in your circumstances), so file this carefully.  The IRS web site discusses filing a name change here, although I didn’t find it to be particularly informative.  I was looking for something a little more explicit to make sure I got it right, so I called the IRS.  Steps went a little something like this:
    1. Called the IRS at (800) 829-4933, which is both their “Business and Specialty Tax Line” and their EIN hotline.  It’s listed among a whole list of IRS hotline numbers here.
    2. It was a little before noon on a Monday morning when I called, and I waited on hold for about 50 minutes before I spoke to a human in the right department.  I pressed the following sequence of automated phone menu options (valid on date of publication):  1 for English, 1 for EIN info, 3 for “already have an EIN and need to ask questions” (or something like that).
    3. When I eventually spoke with a human, the lady on the phone was pleasant, and I’ll paraphrase the instructions she gave me:
      • You need to notify the “Entity Department.”
      • You can fax this request to (859) 669-5748, or you can mail it to IRS-Stop 343G, ATTN: Entity Department, Cincinnati, OH 45999. *** see notes below about contact info!! ***
        NOTES: The address and fax number might have been specific to my geography or my circumstances, so do your own research. Also, the lady told me that if I use the mail, my request might not even be processed (“looked at”) by a human for 4-6 weeks. However, she said that faxed requests are usually turned around in 2-3 weeks. She seemed to be encouraging me to fax my request instead of mailing it.
      • Include with your letter a copy of the amended articles you received from the State Corporation Commission.
      • Also include a clear reference to your company’s EIN and indicate the new company name to associate with that EIN.
      • In your letter, request that they issue you “147C letter,” which (I think) verifies that your EIN/TIN has been associated with the new company name.  (I don’t know the finer points of a “147C” other than she told me to request it.  As with everything in this article, I recommend you do your own research on that.)

    * UPDATE #1: It’s late April, and I just received my 147-C letter confirmation from the IRS. I sent the letter in mid-March, so the turn-around time was about 6 weeks.

  6. Notify your County.  I live in Northern Virginia.  I called my county’s  Business License Tax office, and they instructed me to send them a letter informing them of my business name change.  Along with my letter, I was told to include a copy of the State Corporation Commission’s articles of amendment confirmation, and to specify that my EIN remained the same as it always was.
    * UPDATE #2: I was a little slow about getting things squared away with the county. In late July, I visited the county office with my Certificate of Amendment from the state and my IRS 147-C letter. I explained what I was there for, they reviewed my records to make sure my business was in good standing, and within about 20 minutes, I had an updated business license record. I’m sure I could have accomplished the same thing with a mailed letter, but I got some confusing instructions when I called their office about that, so it was just easier for me to visit the office in person and make sure they had everything in one fell swoop. It was pretty quick and painless.
  7. Notify Dun & Bradstreet and other registrars.  Did you ever register for a DUNS number?  If so, Dun & Bradstreet has an entry for you.  I used their iUpdate capability to notify them that my name changed.  If you’re on record with other registrars, trade groups, etc., make sure you follow appropriate steps to update them.
  8. Notify your Bank, Clients, etc.  Your business bank accounts should be updated to reflect your new company name.  You might need to order new checks too.  Your clients will also need to be updated.  Ditto for anyone else you’re registered with, do business with, etc.

Presumably, those are all the hoops I’ll have jump through to operate under my new business name.  If you think I missed anything, or if you found this article helpful, I welcome the feedback!